Bike Gearing 101
Understanding gearing, cassette, and chainring theory with examples
They say power is nothing without control.
While I agree with that statement wholeheartedly, sometimes the trouble is effectively utilizing the power.
This article is the first in a discussion on gearing, with an emphasis on choosing the correct gearing for a specific riding application. (See Part 2 here.)
Just like a time trial bike isn’t the most efficient bike for a training ride with a lot of climbing—the cassette and chainrings on a time trial bike would be out of place on a climbing bike—maybe you have the legs that it just doesn’t matter. These articles will provide the information required to choose appropriate gearing for a specific application.
This first article will discuss the physics behind gearing and cassette selection. The second will focus on cranksets: chainrings and crank arms. The last part will discuss gearing for different types of bikes.
In this post:
Before we get going, I want to make sure that we're all on the same page in terms of bike anatomy. Follow the link below for our guide (or refresher!) to bike parts and anatomy:
Gearing: Starting with Theory
We all know that using different diameter gears can result in a very high speed or a very low speed for a given pedal speed. Most people generally do not put a lot of thought into why this is the case, probably because knowing which gears go fast and which go slow is enough to make do.
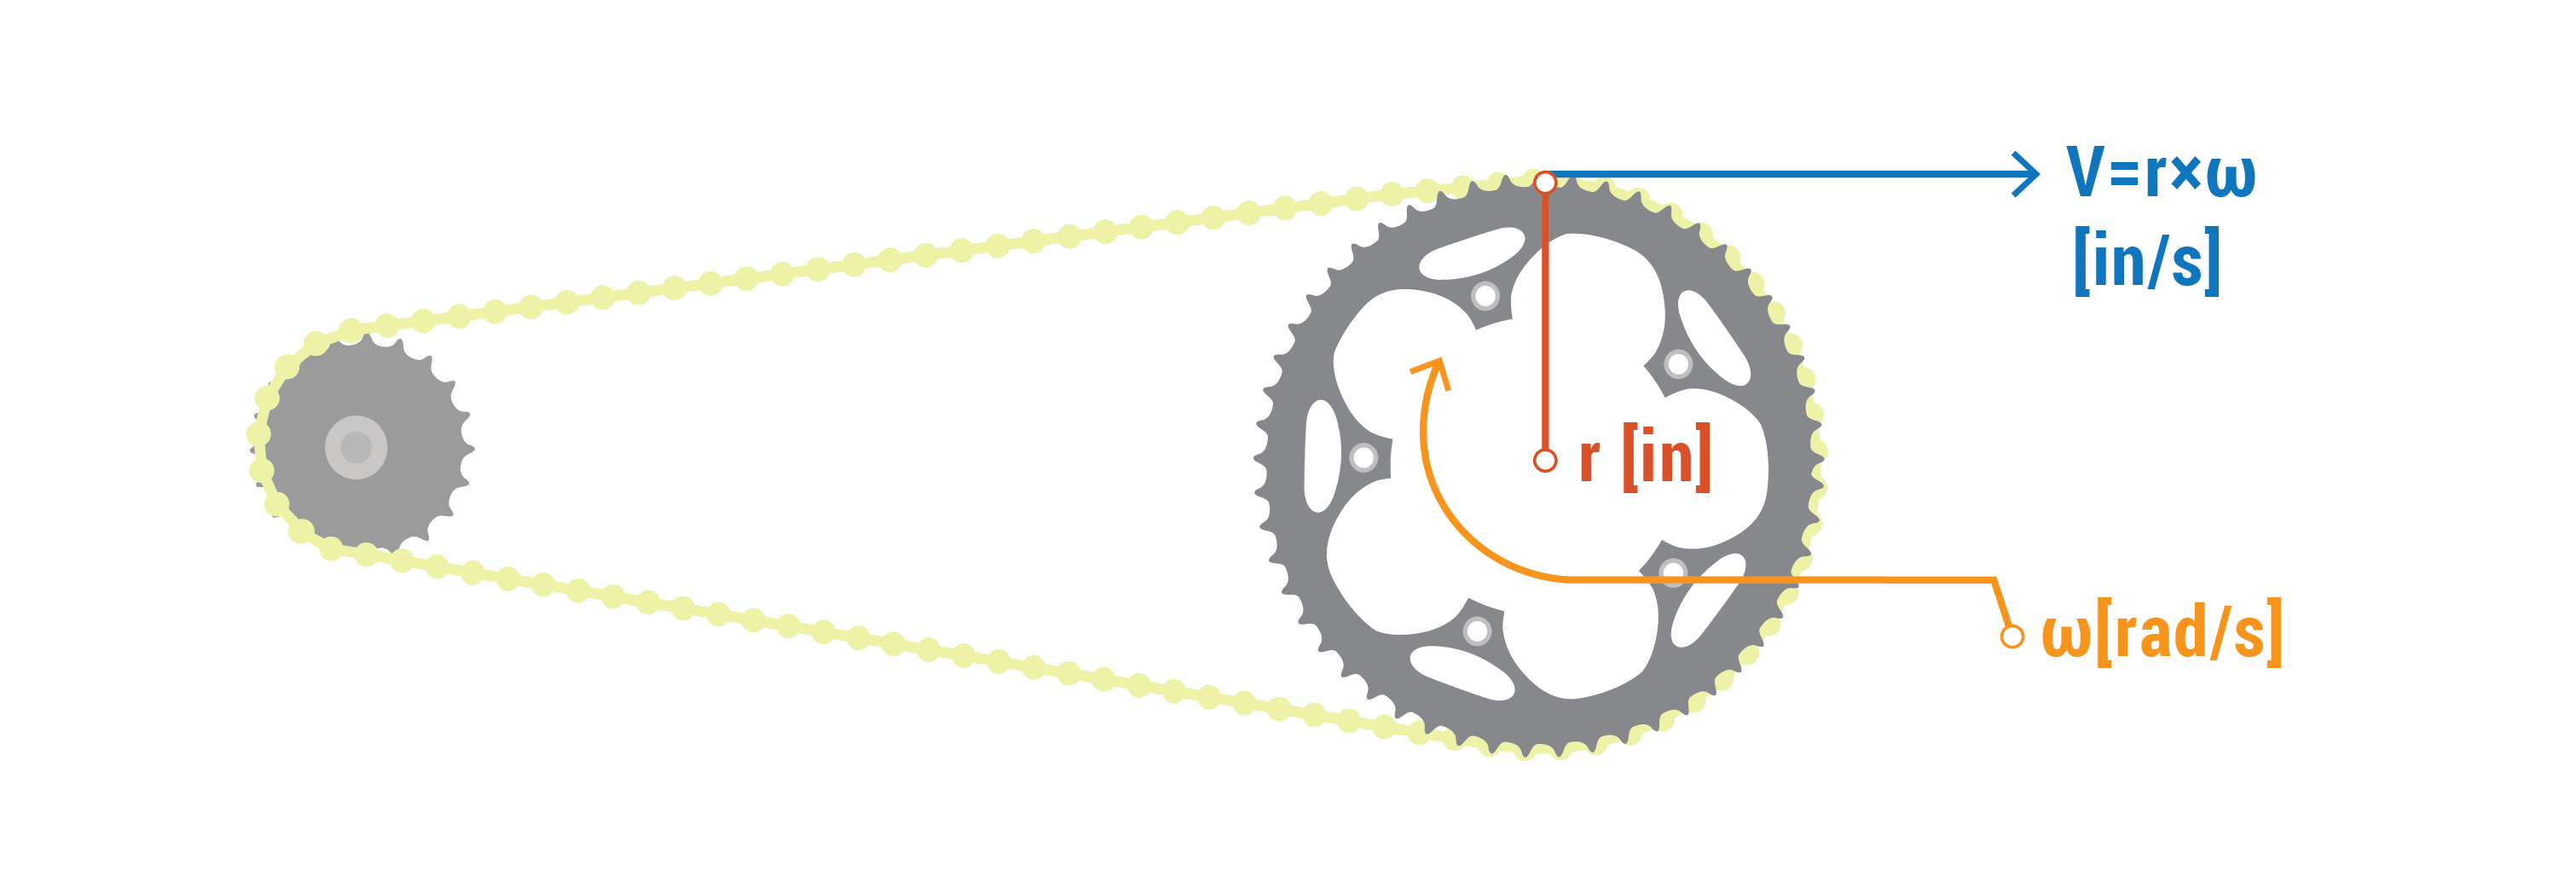
Suppose we have a certain cadence, for convenience we’ll call it ω, the greek letter omega. Omega is the standard nomenclature for a rotational velocity with units of radians per second—measured about our crank spindle. (Radians are like degrees, a measure of angle.)
Since we know the chainrings don’t deform while we pedal—no matter how strong we think we are, they don’t—we can assume that ω is the same at the crank spindle, at the chainring teeth, and at the pedal. The magic happens where the radius at which this ω occurs, and we’ll see what that means in just a bit.

The following image shows the fundamental relationship between angular velocity and tangential velocity.


Since we’re a little wild and crazy, assuming the chainrings do not deform while pedaling, let’s also assume the chain does not stretch significantly compared to its length while riding. So we know we’re pedaling at ω and our gear teeth are rotating at ω as well; is our chain also going at ω?
Well, yes and no; mainly no. In the case of the chain, it is more useful to think of its linear velocity V in inches (or meters) per second. So what, as long as the chain connects the chain rings to the cassette, why would we possiblly care about chain speed—I mean, have we ever seen that mentioned online or in magazines before?
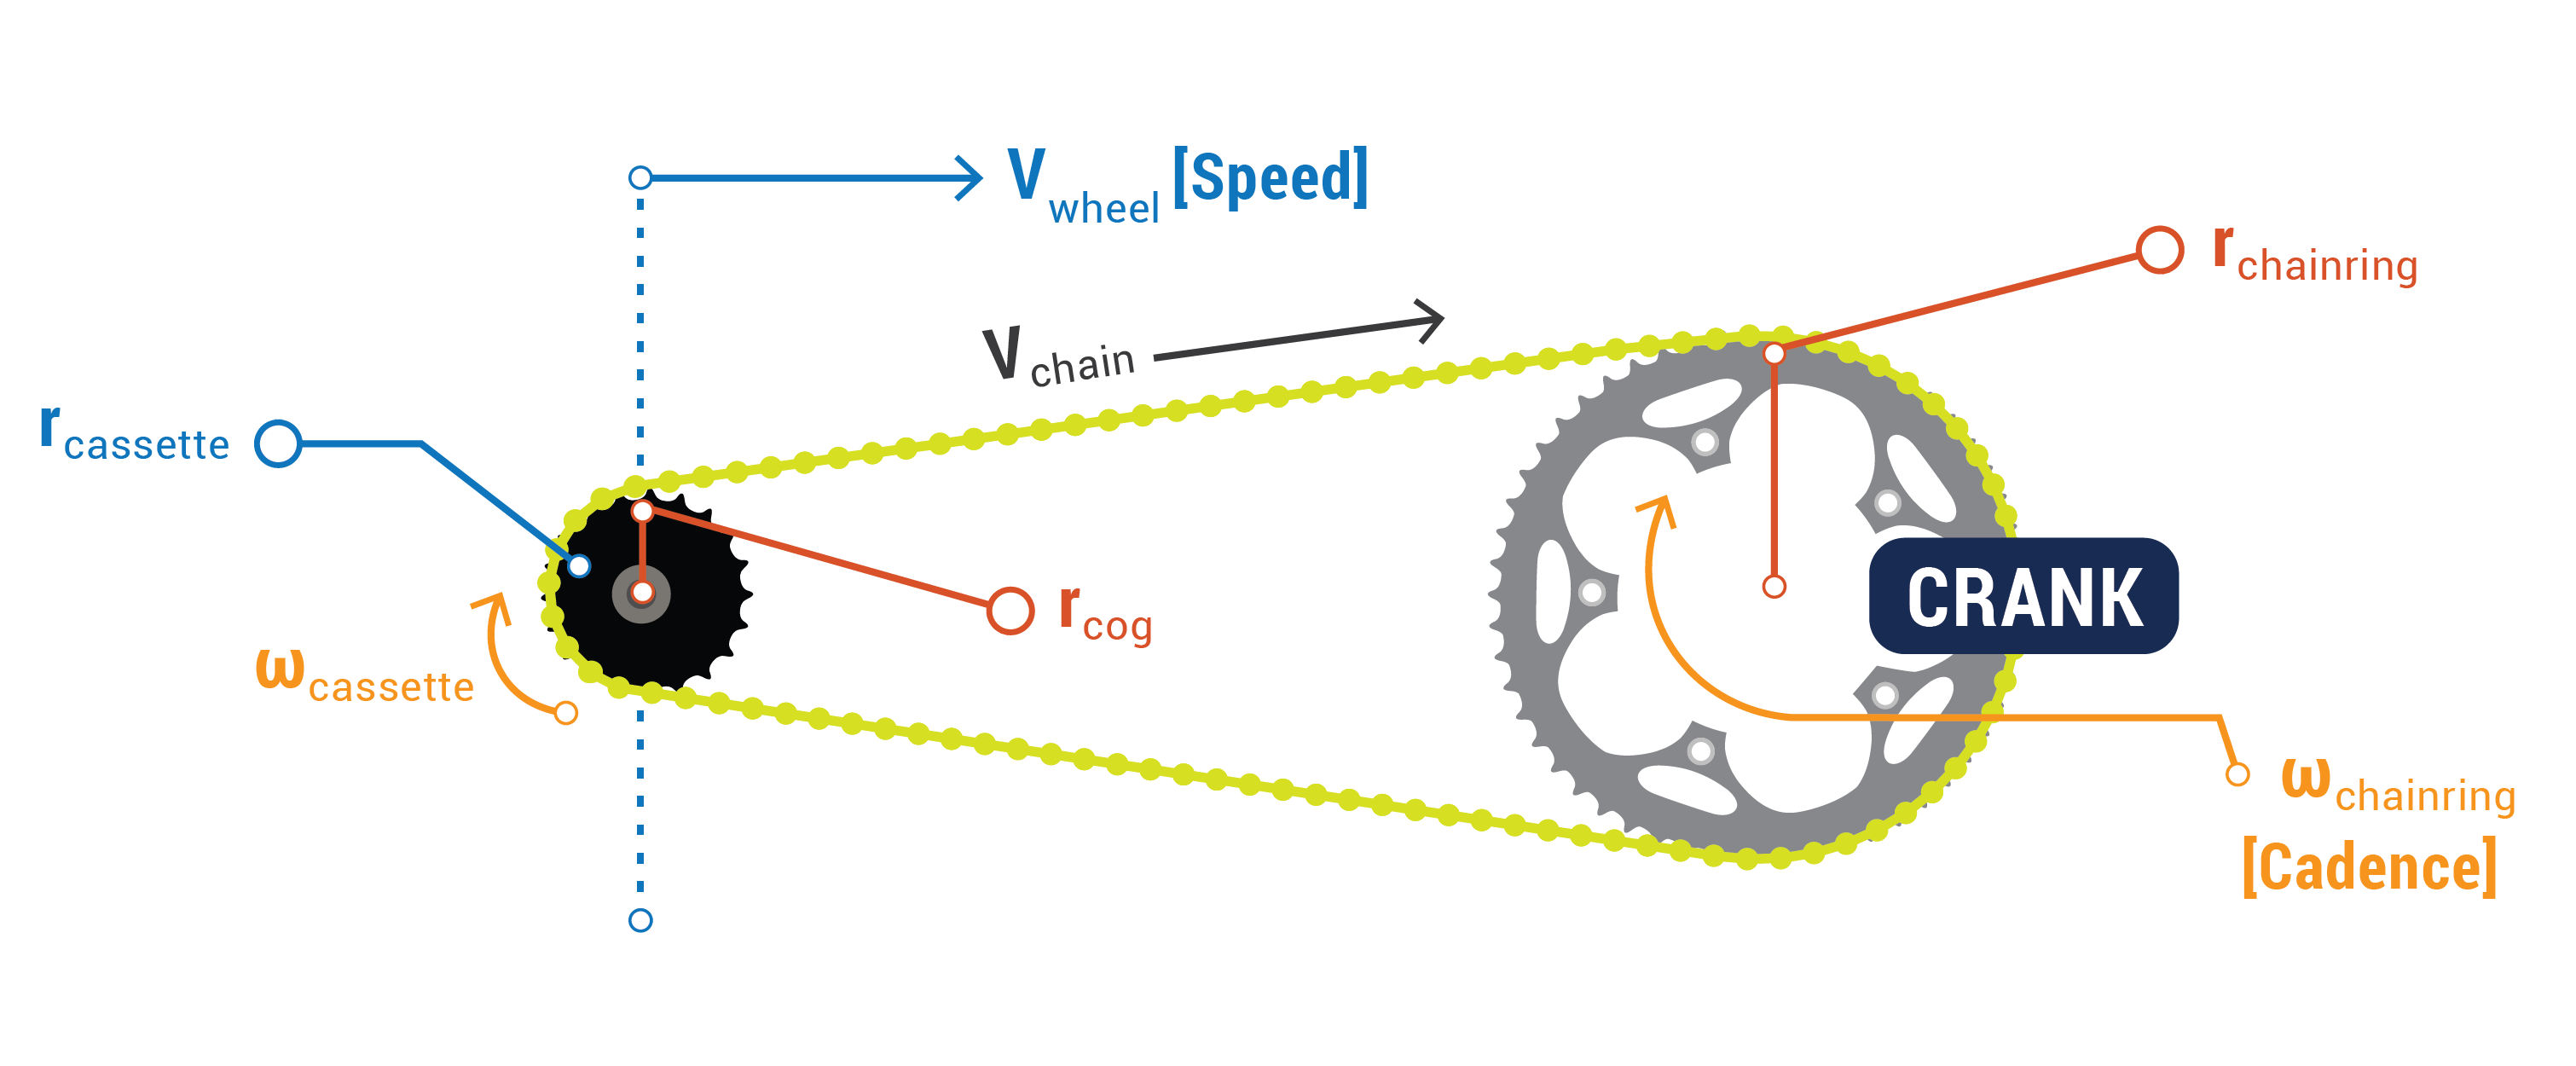
Chain speed is absolutely meaningless. Technically speaking, we do need to note that there is a chain speed to develop our gearing relationship, but nobody really cares at all except the cassette. The cassette sees a chain speed come from the chainring, and much like the chain rings, turns that linear velocity into a rotational velocity.
Since we calculate a linear velocity by multiplying the angular velocity and the distance from the axis of rotation, we can calculate the angular velocity of the cassette to be the angular velocity of the chainrings multiplied by the ratio of cassette cog radius to chainring radius.
Cassette angular velocity? Since we don’t measure that with a cadence sensor, is it really that important? Well, we in fact do measure the angular velocity of the cassette, we just find it easier to measure it after it’s been multiplied by the radius of our rear tire—then we call it speed and occasionally measure it with GPS satellites 22,000 miles above the earth.

The image below shows everything discussed in the preceding paragraphs—it is messy, but it’s all there; start at the crank and the beginning of the previous paragraph and work towards the wheel speed at the end of this paragraph.

Knowing our desired cadence and gearing ratio, we can determine a speed. Unfortunately, this discussion has been more on the academic side, so a gearing ratio based on the radius of the gears is hardly practical when gears are measured in number of teeth.
We know what the angular tooth spacing of a bicycle gear is, since chains are a standard size, but to calculate along this path much further would only serve to keep us at our desks calculating rather than actually riding.
In general, the gold standard for bicycle information is Sheldon Brown’s website which includes a gearing calculator. I’ve also found the following calculator to be useful—although seemingly daunting at first glance. Luckily, there are many useful gearing calculators online which a user can select gear combinations by number of teeth, input a cadence and wheel size, and find out speed. The online calculators are much more practical, but sometimes an appreciation for the background calculations is a good thought to hang onto while pouring on the power mile after mile.
Putting Theory into Practice
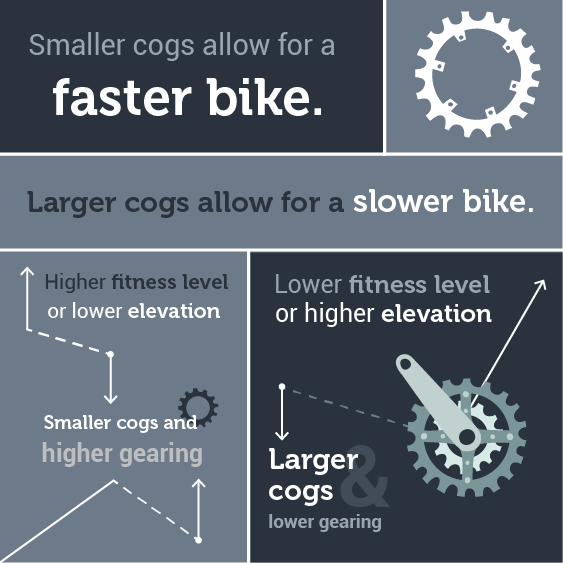
Now onto the practical portion of gearing. As previously mentioned, a cassette should be chosen for a specific riding style and locale—otherwise, we find little enjoyment trying to keep up while fighting our gears. We know that the smaller cogs on a cassette allow the bike to go faster and the larger cogs allow it to go slower—that was intuitively clear after going through the section of the physics behind gears.

How small and how big of a gear do we want? This is where the rider needs to assess their capability and the terrain over which they plan to ride. Typically, a rider with a higher fitness level or someone riding with less elevation gain will gravitate to cassettes that have higher gears, say an 11-23.
Riders with lower fitness or those who plan to put in serious elevation gain tend to gravitate to higher gearing like an 11-32. While anyone could utilize an 11-32, they may find the jumps required to go from 11 to 32 in only 11 gears is annoying—and frequently people will miss their 16T, an apparent sweet spot.
Cassette Sizes Explained
If the nomenclature 11-32, for example, is a mystery, that is a common way cassette sizes are denoted.
For example, Shimano makes an 11-32 cassette with the following teeth: 11, 12, 13, 14, 16, 18, 20, 22, 25, 28, and 32 teeth. We’ll notice making a jump of 21 teeth over eleven cogs leaves some teeth out and at times making the jump of two teeth to the next gear feels inconvenient.
Conversely, Shimano also makes an 11-23 cassette with the following teeth: 11, 12, 13, 14, 15, 16, 17, 18, 19, 21, and 23. There are only two missing gears, a 20 tooth and a 22 tooth—both in the lower range which might find the rider out of the saddle, where the body seems to be less sensitive to specific cadence sweet spots.
This is not to say Sram or Campagnolo do not make these cassette sizes—all manufacturers make very similarly sized components—or that Shimano is better or more appropriate than the others—each have their merits and fan base.
Example Scenarios
Since I’m the only person in the room at the moment to poll, I can tell you that I’m a stronger and bigger rider—tall with powerful legs (meaning I weigh more than average)—so I may find myself using higher gears on even slight declines, and also find myself quickly grabbing lower gears as the grade goes above five percent.
1. The Stronger Rider
My road bike has an 11-27 since my lighter riding partners seem to like hills and my TT bike has an 11-25 because the time trial nearest me insists on having a 500 foot climb in the first four miles, otherwise an 11-23 would find its place in back on the TT bike.
I haven’t been bothered enough by those selections to change cassettes and would probably replace them with equivalents when they’ve worn—some of the people I ride with don’t seem like they would have the leg strength to push an inappropriately large gear due to poor cassette selection.
I don’t mind the larger gear jumps in the 11-27 because leg strength has not historically been a problem; when the cassette jumps two teeth, I can push the weight. This certainly is not a luxury afforded to everyone I ride with.
2. The Lighter Rider
Let’s say you more closely relate with one of my fellow riders who can barely maintain freight train speed on the flats with a headwind, but crushes my hopes and dreams on the climbs. You know the type, 130 pounds soaked with sweat.
This person may find a two-tooth jump in the cogs to be burdensome as the resulting change in cadence may be too taxing on lightweight legs. In this case, the rider may find a smaller cassette to be helpful, say, an 11-32.
If that results in pushing too big a gear, the chainrings can be changed between the standard 53-39T or compact 50-34T rings—there also exists other options based on the riders individual needs. 46-36T is a common cyclocross ring size, and a 55-42T can sometimes be found on strong time trialists’ rigs with many different options between.
In applications besides road cycling, like mountain biking, we find that average speeds are significantly lower. It is standard to have large cassette cog teeth counts in the 30s and even into the 40s.
We also find that wheel size is more variable in the dirt, from 26 to 29 inches. Wheel size also has a slight effect on gearing, specifically, bigger wheels have the effect of higher gearing compared to the same gears on a smaller-wheeled bike. Enough that people occasionally change cassettes or chain rings to suit a change in tire diameter.
On road bikes, this effect is less pronounced with 700mm being the majority and 650mm an alternate option—occasionally we will see women who transition from 650mm to 700mm wheels drop a tooth or two on the chainring to compensate (lowering the bike gearing to balance out the effective higher gearing provided by the wheel size).
Furthermore, in the dirt riders tend to change riding position somewhat frequently—always going from standing to sitting, leaning side to side, moving forward and backward. Constant moving like this tends to lessen the priority on exact gear selection—the wide range in the cassette also helps to ensure there is almost always room to go up or down a gear. My 11-36 cassette seems to work well for cross-country riding at least up to 25 percent grades, although as we’ll see in the next article as I contemplate going to a single chainring I’ll have to closely check my cassette size.
Next up
Next time, we’ll close the loop on bicycle gearing with crankset sizing and finish up the gearing discussion. If it seems confusing right now, it’ll make sense after the next article when we connect the theory with the practical application and discuss the other half of bicycle gearing.
Go to Part 2.
This article was written by Matt Shinavar


