How to Start Zone-Based Training
The basics of training with zones and why it’s beneficial
The topic of training with “zones” comes up quite frequently in fitness, however, finding a clear explanation of what exactly it is can be elusive. It’s also unclear how you can start using zones, and why they’re so beneficial. This is precisely the goal of this post. Let’s go…
What is zone-based training?
Zone-based training splits your various effort levels into separate, organized and labeled zones. When used properly, they enable you to take full advantage of specific training methods that help you improve as an athlete. You can monitor your zones in real time as you work out with a tracking device, and then deeply analyze them with software afterward — enabling you to make informed decisions about how to advance your training.

Most athletes mainly concern themselves with Zones 1 through 5, which cover the levels of exertion between easy, non-taxing efforts to extremely intense efforts that you can only maintain for short periods of time. For example, in running, walking slowly is categorized in Zone 1. A brisk walking pace is also categorized in Zone 1, however, it’s closer to Zone 2. Zone 5 is an all-out sprint.
Zone training can be based on your heart rate, pace, and power. Power requires a piece of equipment called a “power meter”. You can learn more about power-based training in cycling in this post.
How are zones used?
Zones are used in many different ways, depending on the type of training being done. If you’re training for a half marathon, you may follow a plan that primarily focuses on Zone 2. Besides established training plans, zones are also commonly utilized in general fitness. For example, in interval workouts, athletes often target specific zones for different segments.
How do I get started in zone training?
The first step is to accurately measure your current training zones. In this article we'll explain how to determine your heart rate zones for running and cycling, as well as your pace zones for running.
Fitness tools like GPS sports watches and training software like SportTracks come set to default zones. In order to start using training zones in earnest, you need to determine your “threshold zones”, and then adjust these default zones accordingly.
What the hell is a threshold zone?
Think of a threshold zone as your personal tipping point. If you exceed a threshold zone for too long in endurance sports, you will wear yourself out prematurely. The most common type is your Lactate Threshold Heart Rate, or LTHR.

When you’re working out and pushing hard, you will reach a point where your muscles start to burn, and the only way to decrease the burning is to slow down or stop completely. The burning sensation is caused by your body not being able to clear away “lactate acid” from your system quickly enough. However, if you know your current LTHR, and you can monitor it while you work out, you can push yourself right up to this threshold for as long as possible to put in your best effort.
How can I determine my zones?
The most accurate way to determine your current threshold zones is to visit a professional sports laboratory, however, this method costs money, and not everyone has access to a qualified facility. Another proven way is to measure them yourself. Thankfully, it’s possible to accomplish this with basic equipment and an hour of free time.
How to conduct a threshold zone test
In order to determine your heart rate and pace thresholds, you need to execute a 30-minute workout where you go as fast as you can, non-stop on a flat course, while tracking with a GPS watch, bike computer, or a mobile fitness app. Wearing a heart rate monitor is required to determine your LTHR (more information on this test can be found in this post). An indoor trainer for bikes or a treadmill can also be used.
When you conduct this test yourself, don’t go slow for the first 10 minutes and then harder for the final 20. Do your best to move at an even level of exertion the entire time, while still pushing as hard as you possibly can without slowing down.
Your average heart rate from the final 20 minutes of this test is your LTHR. Your average pace from the entire 30 minute test is your pace threshold. You can find these averages by uploading your workout to SportTracks (non-subscribers can easily use the free 45-day trial).
How you find your LTHR in SportTracks:
1) After uploading this workout, select it from the Dashboard in SportTracks
2) In the bottom left corner of the graph, change “Distance” to “Time”
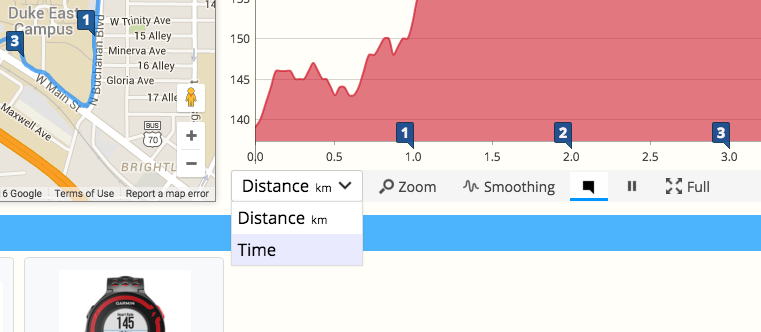
3) Hover over the 10-minute mark at the base of the graph, then click and drag to the end (which should also be the 30-minute mark)

You can now see your average heart rate for this portion of the test. It's worth noting that pressing the "Lap" button on your device at the 10 minute mark during the test is unnecessary if you're analyzing the results with SportTracks.
How to determine your zones from the test data
I recently tested my own LTHR and pace zones for running. I ran on an outdoor gravel trail that wasn’t perfectly flat, but flat enough for this test. My average heart rate from the final 20 minutes of the 30-minute workout was 164. My average pace from the entire workout was 5:55/km.
Here’s how to determine the training zones from this data:
For heart rate, anything less than 85% of your LTHR will be Zone 1. Since my average heart rate was 164, 85% of 164 = 139.4. So, for me, anything lower than 139.4 will be Zone 1.
Here are the heart rate and pace training zones for running and cycling:
Running Zones based on LTHR
Zone 1 = Less than 85%
Zone 2 = 85 to 89%
Zone 3 = 90 to 94%
Zone 4 = 95 to 99%
Zone 5 = 100 to 104%
Cycling Zones based on LTHR
Zone 1 = Less than 81%
Zone 2 = 81 to 89%
Zone 3 = 90 to 93%
Zone 4 = 94 to 99%
Zone 5 = 100 to 102%
Zone 6 = 103 to 106%
Zone 7 = Over 106%
Running Zones based on Pace
To determine pace zones, I need to do some math. I'll start by first converting my mm:ss threshold pace to a decimal pace by dividing 55 seconds by 60 = 0.92. It's best to round your average pace to the nearest tenth. Since my threshold pace was 5.92/km I rounded this to 5.9. Zone 1 is anything slower than 129% of your threshold pace. 129% of 5.9 = 7.61. To convert this decimal to a mm:ss pace I need to multiply the .61 by 60 seconds = 37. Our final result is 7:37, so, Zone 1 is 7:37/km and slower for me. You can use this same approach for pace /per mile; the math is identical.
Here are the pace zones for running:
Zone 1 = Slower than 129%
Zone 2 = 114 to 129%
Zone 3 = 106 to 113%
Zone 4 = 99 to 105%
Zone 5 = 97 to 100%
How can I use this data?
When you know your zones, you can start applying them. As mentioned previously, many endurance training plans lean heavily on Zone 2, even though this effort feels like a light jog. Zone 5 is demanding, but intentionally working out in this zone on a regular basis can dramatically improve your fitness. A basic Zone 5 workout could have a 10-minute warm up in Zone 2, followed by 15 minutes in Zone 5, and conclude with a final 10-minute cool down in Zone 2.
Interval training is an excellent way to improve as an athlete, as we discussed in our article about the key features in GPS sports watches. As you get more involved in interval training, you will likely want to target, hit, and maintain specific zones during the separate segments of your intervals.
Learn how to use Pace Zones in this SportTracks blog post.
Conclusion
Hopefully this article has provided you with a better understanding of the basics of zone training. It’s a rather deep topic. Explaining it is like unraveling yarn from a sweater. But, they’re powerful tools that both beginner and experienced athletes should definitely embrace.
Speaking of sweaters, I don't recommend wearing one during your threshold test. It was 41 degrees fahrenheit when I did mine. I was wearing summer running clothes, and after the first seven minutes I didn’t regret it. :P
| Article written by Sam Mallery, Director of Marketing, Zone Five Software Inc. |
Comments
Very good topic and easy to determine zones, thank you and don't stop to improve sporttrack mobi !
Well, as I read on the topic, it turns out that the lactate threshold (LT) is the point at which lactic acid is just beginning to accumulate while the anaerobic threshold (AnT) describes the point at which lactic acid builds faster than the body is able to remove it. Which means that AnTHR should be notably higher than LTHR.
Now, AnT is rather universally understood as the maximum level of exertion that an athlete can sustain in a one hour effort, and a common field test for determining AnT involves a 20-minute time trial after which 5% is subtracted from the average heart rate, speed or power.
LTHR should be lower that AnTHR, which means that it should be notably lower than 20-min time trial average HR minus 5%. While in this article the author suggests that LTHR is determined by a 20 min time trial by taking the average HR, without any correction. As I understand this will give LTHR value significantly higher than the actual LTHR.